# Module Project
## Time Tracking App Using Pomodoro Technique
### Overview
The project is based on keeping time of any project with its subject by using the Pomodoro technique which was developed in the late 1980s by then-university student Francesco Cirillo. This technique helps the ones who are struggling to focus on their studies and complete assignments. With this project, the user will be able to track the time by using the Pomodoro technique and will be able to see the overview of the time spent on a specific subject under a project(topic).
A User Case for the Program
To illustrate, a student wants to study the “Equations” subject under the “Maths” project(topic). Firstly, the student will enter the project name as “Maths” and enter the subject in the program then he will be able to start the Pomodoro sessions. Before each session, the program will ask for a “To Do List” for that specific sub-session of Pomodoro, and also at the end of the session the program will ask again for which of these to-do-list are managed in that session. After sessions, the student can start a new Pomodoro session after a long break. At the end of the Pomodoro sessions, the summary of the time tracked will be automatically emailed to recipients (users/parents/friends). Users can also manually send a summary email to recipients manually from the main menu.
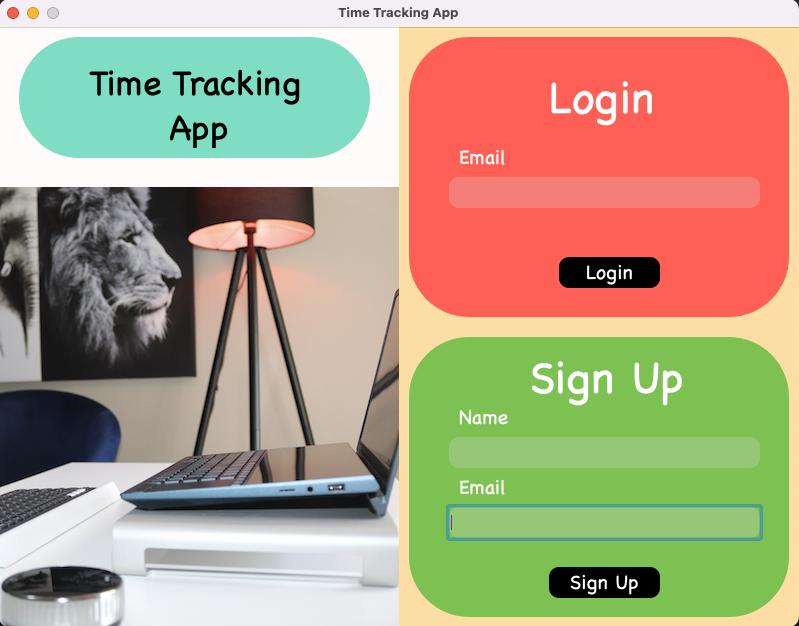
### Gui Details
1. **Login / Sign-Up Screen**
1. Simple user login system
* User's email
2. Simple user sign-up system
* User’s name
* User’s email
2. **Main Menu Screen**
1. **User’s Workspace**
* Add/Delete recipients’ emails
* Delete a project
* Delete a subject
2. **Start Pomodoro**
* Add a new project or subject
* Select the project and subject for the new Pomodoro to start
3. **Tracking History**
* Select a project or all projects
* Select a subject or all subjects
* Select a period
1. Today
2. This Week
3. This Month
* Total Time tracked
* Feature of sending an email of the tracked history (project, subject, and period) to the recipients.
* An overview table of tracked history
3. **Pomodoro Screen**
1. Main Menu Button
2. Showing the current number of Pomodoro, for example, 1,2,3, or 4
3. Add Task(s) for the current Pomodoro session (25 min.)
4. Counting down timer
5. Start/Pause time button
6. "I am done with this session" button (go to a short break or long break)
7. Asking for the accomplishment of the tasks
4. **Short Break Screen**
1. Main Menu Button
2. Counting down timer (5 min.)
3. Start/Pause time
4. Skip button (go to next Pomodoro session)
5. **Long Break Screen**
1. Main Menu Button
2. Counting down timer
3. Start/Pause time
4. Skip button (go to the main menu)
### General Info
* Each team will have 1 Mentor.
* Trello Board will be used in the project.
* This is mandatory.
* Mentor will check whether the team uses Trello actively.
* Team mentors will also be added to the board.
* There will be at least 30-minute meetings with teammates every day.
* The content of the daily meeting is generally as follows:
* What each teammate has done
* The general direction of the project
* Task sharing until tomorrow
* In Trello, there will be a list in the name of that specific date. Details, tasks, and things to be done at the meeting will be kept in Trello daily in that list.
* It is crucial to follow the steps in order to complete the project.
* A meeting will be held with 1 mentor of the group and group members(students) on the specified dates (once in 2-3 days). The dates are written below. The time of the meetings will be determined by each group mentor and group members.
* The part at each step will be completed until that meeting and the new step will be started. Each student in the team will present the part he/she did in that step to the mentor in the meeting.
* After each meeting, the mentors will make an assessment of whether each team member gets progressing or not.
* After the project is completed, a project presentation will be made in a location or online where Pycoder's instructors will be present.
### Definition Of Done
* Full attendance at meetings with mentor
* UML Diagrams (Class, Activity)
* A Program runs appropriately.
* Presentation of the project
* GitHub repository with a ReadMe
* Medium article (optional)
### **Program Stack**
* VSCode
* JSON for holding data
* UML Diagram(Class diagram, Activity diagrams)
* GitHub Object
* Oriented Programming
* PyQt5 for GUI (Default template will be provided for GUI)
### **Bonus**
There are some “Bonus” parts under the subsections of the steps. If you have enough time, and eagerness to show your skills and make a more featured program, then try to implement them.
## Instruction Steps
You have to stick to the schedule. You will have a progress meeting with your mentor once in 2-3 days (specified in the meeting schedule section). You have to complete related steps before the following meeting.
### **Step 1**
**Duration: 0.5 day**
* Introduction Presentation
* Reading instructions.
* Understanding and discussing with your teammates the requirements of the project.
### Step 2
**Duration: 1.5 - 2 days**
#### **UML Design (Making Plan)**
**Note:**** These diagrams will be in your presentation at the end. Please pay strict attention to this part of the project.**
source: creately.com
You can use this tool to draw UML Diagrams →[Link](https://app.diagrams.net/)
1. Class Diagram
* Watch this tutorial -> [Link](https://youtu.be/UI6lqHOVHic)
* As a group, draw a Class Diagram for your project.
2. Usecase Diagram **(Bonus)**
* Watch this tutorial → [Link](https://youtu.be/zid-MVo7M-E)
* As a group, draw a Use Case Diagram for your project.
3. Activity Diagram Watch this tutorial →[ Link](https://youtu.be/Wf_xlagfHmg)
* As a group, draw an Activity Diagram for your project.
* There should be at least 4 activity diagrams for each flow of logic.
* For example:
* Sign Up/Login Logic,
* Adding/Deleting Projects/Subjects,
* Tracking History,
* Pomodoro-Shortbreak-Long Break Sessions, ...
**Note:**** Present your diagrams to your mentor! You will also present them in the presentation at the end. After presenting your diagrams to your Mentor, You will be able to start programming part by cloning your default GUI.**
### Step 3
**Note:**** You will have an access to the programming part after your mentor validates your step 2.**